


This month we announced a very exciting partnership with Canonical, the makers of Ubuntu. Above all, the main element in this partnership is the introduction of full CloudInit support between the CloudSigma cloud and Ubuntu.
An introduction to CloudInit
If you’re not familiar with CloudInit, it is the industry standard for bootstrapping cloud servers. To clarify, if you are using a simple DSL it is possible to easily perform tasks on first boot. It is also worth pointing out that CloudInit isn’t limited to Ubuntu. Today you’ll find CloudInit support in most modern Linux distributions (but the supported clouds will vary).
Before we get started with CloudInit, it is important to understand where CloudInit fits into the provisioning ecosystem. While it is possible to run CloudInit as a stand-alone provisioning system, it is far more common to use it in conjunction with another provisioning system, like Ansible, Chef, Puppet or Salt. In that case, you would simply use CloudInit to bring your new server to a state where the provisioning system can take over. Personally, I often use CloudInit in combination with Ansible.
Using CloudInit on CloudSigma
Using CloudInit on CloudSigma is very straightforward.
In order to use CloudInit on an Ubuntu 14.04 server, take the following steps:
-
- Clone the drive “Ubuntu 14.04 Cloud Image” from the marketplace (currently the only fully supported drive with CloudInit). Make sure to resize the cloned drive to the desired size and it will automatically expand the file system on first boot.
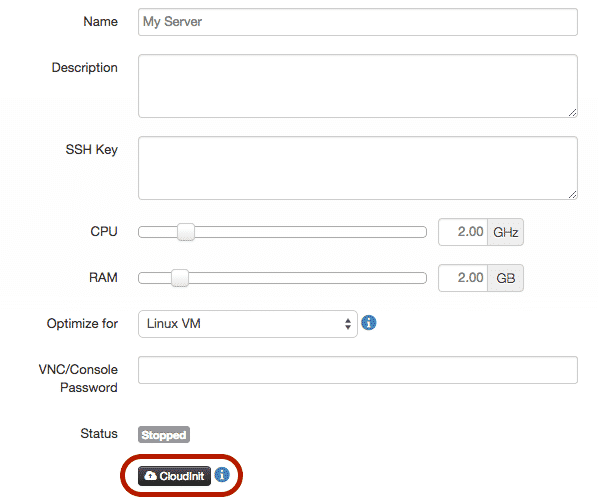
- Create a new server.
- With the server created, you’ll see a CloudInit button below the server status.
-
- When you click on this button, the following dialogue will appear.
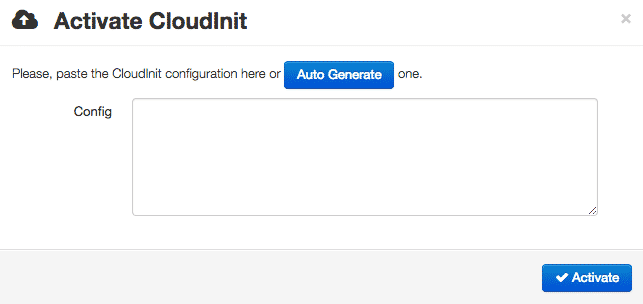
- Simply paste in your CloudInit data here, and press ‘Activate’.
- You can start your server and the script will run on first boot.
Install SSH Key(s) with CloudInit
Now that you know how to use CloudInit on our cloud, let’s put this newfound knowledge to use by using it to install two SSH keys. The two fictional public SSH keys that we will be using are ‘ssh-rsa AAA[…] user1@host‘ and ‘ssh-rsa AAA[…] user2@host‘. (To learn more about generating SSH keys, please take a look at this page on Github.)
On Ubuntu Cloud Images, the default username is ‘ubuntu’. Hence, the keys will be installed into that user account.
The CloudInit configuration for this would look as follows:
[ruby]
#cloud-config
ssh_authorized_keys:
- ssh-rsa AAA[...] user1@host
- ssh-rsa AAA[...] user2@host
[/ruby]
Please note that spaces matter. There are two spaces before the ‘-‘. If you only put one, it may not be read by the server.
Once you have saved the CloudInit configuration and booted up the server, you should be able to SSH into the server using the ‘ubuntu’ user:
[bash light="true"]
$ ssh ubuntu@aaa.bbb.ccc.ddd
Welcome to Ubuntu 14.04.1 LTS (GNU/Linux 3.13.0-36-generic x86_64)

* Documentation: https://help.ubuntu.com/

System information as of Sun Oct 19 21:51:54 UTC 2014

System load: 0.0 Users logged in: 0
Usage of /: 77.4% of 39.34GB IP address for eth0: aaa.bbb.ccc.ddd
Memory usage: 26%
Swap usage: 0%
Processes: 113

Graph this data and manage this system at:
https://landscape.canonical.com/

Get cloud support with Ubuntu Advantage Cloud Guest:
http://www.ubuntu.com/business/services/cloud

0 packages can be updated.
0 updates are security updates.
[...]
ubuntu@myserver:~$
[/bash]
Install system updates with CloudInit
Another very useful thing that you can easily accomplish with CloudInit is to run system updates on first boot. While we are refreshing our disk images frequently, it is still a good idea to take additional precautions to ensure that your systems are up to date.
To install system updates on first boot, add the following:
[ruby]
#cloud-config
apt_update: true
apt_upgrade: true
[/ruby]
You may also notice that there is a similar option called ‘package_update,’ which is a distribution neutral alias for ‘apt_update’ on Ubuntu.
Also, ‘apt_update’ will be set to true by default if ‘packages’ (below) is set, but I’ve added it above to make it more explicit.
Install packages with CloudInit
One fundamental part for bootstrapping systems is to be able to install packages on boot. Fortunately, CloudInit makes this easy too. All we need to do is to specify a list of the packages we want to install under ‘packages.’ For instance, if we’d like to install ‘python-pip,’ ‘fail2ban’ and ‘vim’, it would look as follows:
[ruby]
#cloud-config
packages:
- python-pip
- fail2ban
- vim
[/ruby]
Again, please note that spaces matter. There are two spaces before the ‘-‘.
Setting the hostname using CloudInit
When you provision a new server, you may also want to set the hostname for it.
[ruby]
#cloud-config
hostname: mynode
fqdn: mynode.example.com
manage_etc_hosts: true
[/ruby]
Run commands on first boot with CloudInit
Assuming you’re doing something more sophisticated with your servers, chances are that you have some command that you need to run upon first boot.
This is where the ‘runcmd’ and ‘bootcmd’ comes into play. Both of these allow you to run commands on first boot. The difference is that ‘bootcmd’ executes earlier in the boot process than ‘runcmd.’
To use either of these commands, add the following to your CloudInit:
[ruby]
#cloud-config
runcmd:
- ls -l /root
- [wget, "https://news.ycombinator.com", -O, /tmp/index.html]
[/ruby]
Using CloudInit with a configuration manager
Lastly, if you’re a more refined cloud user, you are most likely using some configuration manager. Fortunately, CloudInit comes prepared for this. It is however a rather complex topic to cover, given the many variables.
So, here are some examples that should be able to point you in the right direction:
How to tie together multiple elements
For those not familiar with YAML-style files, it may not be obvious how to chain together multiple CloudInit elements. It is however straightforward. On the first line, you need ‘#cloud-config‘. After that, you simply add your configuration.
For instance, combining all of the above examples into one configuration would look as follows:
[ruby]
#cloud-config
ssh_authorized_keys:
- ssh-rsa AAA[...] user1@host
- ssh-rsa AAA[...] user2@host
hostname: mynode
fqdn: mynode.example.com
manage_etc_hosts: true
apt_update: true
apt_upgrade: true
packages:
- python-pip
- fail2ban
- vim
runcmd:
- ls -l /root
- [wget, "https://news.ycombinator.com", -O, /tmp/index.html]
[/ruby]
Additional resources
We’ve really just scraped the surface of what CloudInit can do in this article. There are a ton of other things you can also do to learn, such as creating users and groups, write out files to disk and call URLs when finished (for notifying other systems).
If you want to learn more about CloudInit, I recommend the following sources:
- Official CloudInit documentation
- Ubuntu’s CloudInit guide
- RedHat’s CloudInit documentation
- Ubuntu’s CloudInit example library
- Manage Docker resources with Cgroups - May 12, 2015
- Docker, Cgroups & More from ApacheCon 2015 - April 30, 2015
- How to setup & optimise MongoDB on public cloud servers - March 24, 2015
- Presentation deck from CloudExpo Europe - March 17, 2015
- CoreOS is now available on CloudSigma! - March 10, 2015